8. Finding the correct setting
Compressors are most often used for the following applications:
- Efficient utilization of an A/D converter – less virtual headroom must be accounted for. (Recording)
- Compensation for unwanted level changes of an instrument. Adjusting unevenly played bass drum hits (by a semi-professional drummer) is a common example. Instruments blend better within the mix; the mix sounds more balanced. (Mixdown)
- Letting the lead vocal stand out in the mix. (Mixdown)
- Shaping percussive instruments with extreme compression settings. (Mixdown)
- Increasing the density of a mix. (Mixdown / Mastering)
- Increasing the perceived volume of a mix. (Mastering)
- Reduction of the program dynamic range to better suit the expected playback dynamic range. (Mastering)
Often, the question comes up how the compressor should be set exactly. While it is understandable that beginners are looking for precise instructions, we must disappoint you in this regard. There simply aren't any useful values that can be applied universally. The settings heavily depend on which sound you want to achieve for a given signal. For a rock snare drum and a funk snare drum, the settings could be substantially different. The 24“ shell of a heavy rock bass drum must be treated differently than an 18“ jazz bass drum. A female classical voice calls for other settings than a male hard rock vocal. The list could go on and on.
Therefore, we would like to encourage you to gain experience on your own. The presets that are normally included with software compressors can be a good starting point for your own experiments. You will soon discover that the settings can vary substantially, even within the same category.
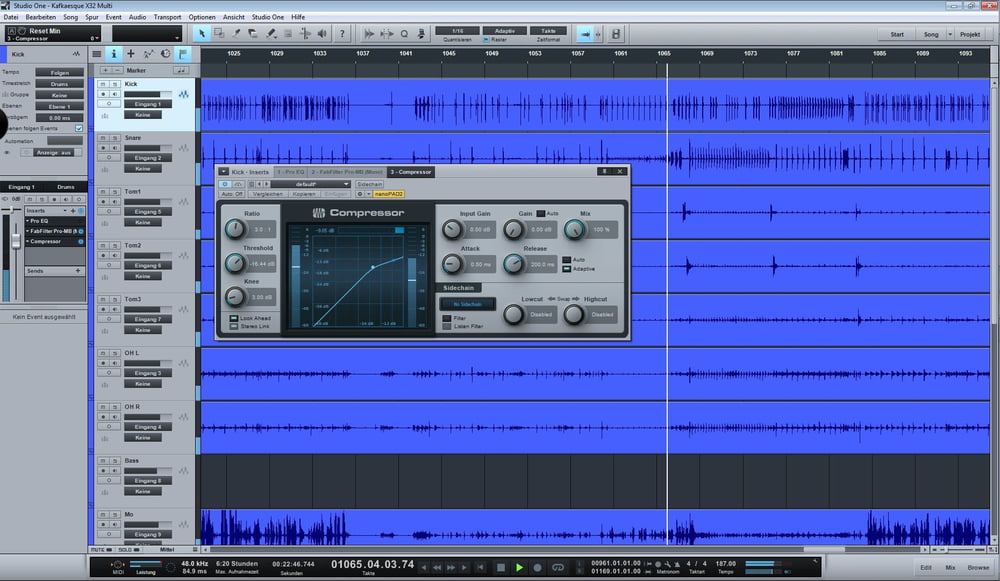
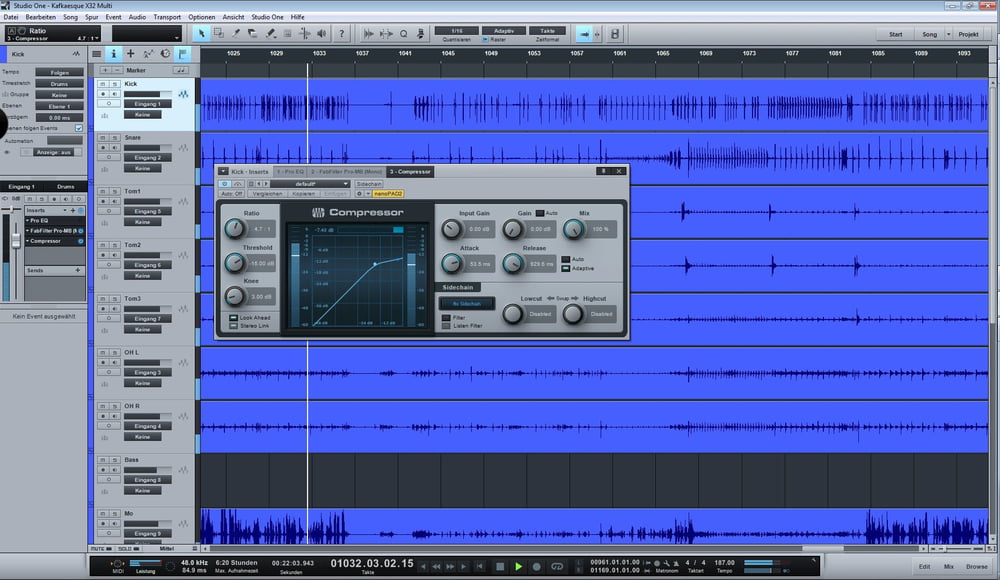
For example, Studio One V2 contains several compressor presets for processing bass drums:
BD Rock
Attack: 0,5 ms
Release: 200 ms
Threshold: -16,44 dB
Ratio: 3 : 1

BD Tight
Attack: 53,5 ms
Release: 929,6 ms
Threshold: -15 dB
Ratio: 4,7 : 1

Even though both settings are meant for bass drums, the values differ fundamentally, especially with regard to the attack and release times.
In order to find a setting that works for your application, try following this guideline:
First, adjust the input level so that it matches the working level of the compressor (0 dB, unity gain). The threshold and ratio should be set to 0 dB and 1:1, respectively. Then, start by adjusting the threshold and ratio. After that, experiment with the settings for attack and release. Remember the different combinations of attack and release times, as described earlier. Monitor the gain reduction meter and use the makeup gain control to compensate for the level reductions and bring the output level up to 0 dB again. Make adjustments to threshold and ratio as needed. Finish up by fine-tuning the attack and release times, until you achieve the desired result. Adjusting a compressor takes some practice; you may have to go back and fiddle with the parameters until you are pleased with the result.
Using a compressor as a limiter
A compressor with a ratio of 1:∞ (1:infinite, this correlates to a horizontal graph from the threshold onwards) is called a limiter. No matter how high the input level, the output level stays constant. In practice, ratios greater than 1:10 are regarded as limiting.
The attack and release times are usually set rather short, in order to eliminate short peaks while leaving the quieter portions of the signal unaffected. However, this demands some sensitive fine tuning. If the attack is too short, it can cause popping noises. An overly short release time causes the compressor to rapidly adjust the level up and down, which is also known as „pumping“. The threshold should be set rather high. A low threshold causes levels to be processed that are better left unaffected, which can aggravate the pumping effect.


Yhteyshenkilösi
Product Highlights
-
Audio- ja efekti-pluginit
-
Efektejä käsittelevät kirjat
-
Dynamiikkaprosessorit
-
Limitterit


